
Buy the product you need

Summer Press on Nail
Summer Press on Nail Medium Lemon Fake Nail Alomnd Yellow Full Cover False Nail Sticker on Nail for Women Girls Glue on Nail French Nail Tip

Gel Polish 6 Colors Jelly Gel Nail Polish
beetles Gel Polish 6 Colors Jelly Gel Nail Polish Set Neon Nail Gel Kit Pink Blue Green Soak Off UV Led Light Summer Translucent Orange Purple Gel Nail Art DIY Manicure Gifts for Girls Women
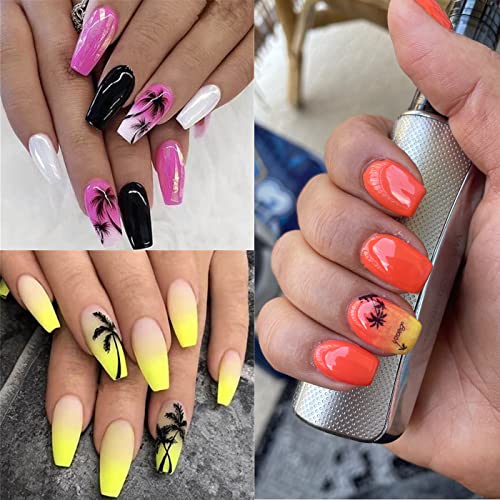
Summer Palm Tree Nail Art Stickers
Summer Palm Tree Nail Art Stickers, Water Transfer Coconut Tree Nail Decals for Nail Art, Tropical Style Ocean Beach Nail Design Sticker for DIY Nails Design Manicure Tips Decorations 12pcs
Step-by-Step Tutorial: How to Achieve the Perfect Summer Nail Art
Summer is the perfect time to express your creativity through vibrant, eye-catching nail art. Whether you're a nail art enthusiast or a beginner looking to try something new, this step-by-step tutorial will guide you through the process of achieving the perfect summer nail art. Get ready to turn heads and showcase your unique style with these simple yet stunning designs.
1. Prepping Your Nails
Before diving into the world of summer nail art, it's crucial to start with a clean canvas. Begin by removing any old nail polish and shaping your nails to your desired length and shape. Gently push back your cuticles and use a nail file to smooth any rough edges. This step ensures that your nail art will have a flawless and long-lasting finish.
2. Applying a Base Coat
To protect your nails and create a smooth surface for your nail art, apply a thin layer of base coat. This step helps prevent staining and promotes better adhesion of the nail polish. Allow the base coat to dry completely before moving on to the next step.
Try Audible Premium Plus and Get Up to Two Free Audiobooks
3. Choosing Your Summer Nail Colors
Summer is all about vibrant colors and bold statements. Consider using bright shades like coral, turquoise, or sunny yellow for a playful and cheerful look. Alternatively, opt for pastel hues for a more delicate and elegant summer vibe. Remember to choose colors that complement your skin tone and reflect your personal style.
4. Getting Creative with Nail Designs
Now comes the fun part – creating your summer nail art designs. Let your imagination run wild and experiment with various patterns, shapes, and techniques. Here are a few ideas to get you started:
a) Floral Delight
Embrace the beauty of summer flowers by painting delicate floral patterns on your nails. Use a thin nail art brush or a dotting tool to create intricate petals and leaves. Play with different color combinations to achieve a stunning, blooming effect.
b) Beach Vibes
Bring the beach to your fingertips by incorporating seashells, palm trees, or waves into your nail art. Use nail stickers or stamping plates for precise and detailed designs. Finish off with a touch of shimmer to mimic the sparkling ocean.
c) Fruitilicious
Nothing screams summer more than fruity nail art. Paint tiny watermelons, pineapples, or strawberries on your nails for a refreshing and juicy look. Experiment with different fruit patterns and add a glossy top coat for a mouthwatering finish.
5. Adding the Finishing Touches
Once you're satisfied with your nail art designs, it's time to seal the deal. Apply a high-quality top coat to protect your artwork and add shine. This step will also ensure that your summer nail art lasts longer without chipping or fading.
Conclusion
With this step-by-step tutorial, you now have the knowledge and inspiration to achieve the perfect summer nail art. Remember to prep your nails, choose vibrant colors, get creative with designs, and finish off with a top coat. Let your nails be the ultimate accessory this summer, showcasing your unique style and spreading the joy of summertime.


No comments: